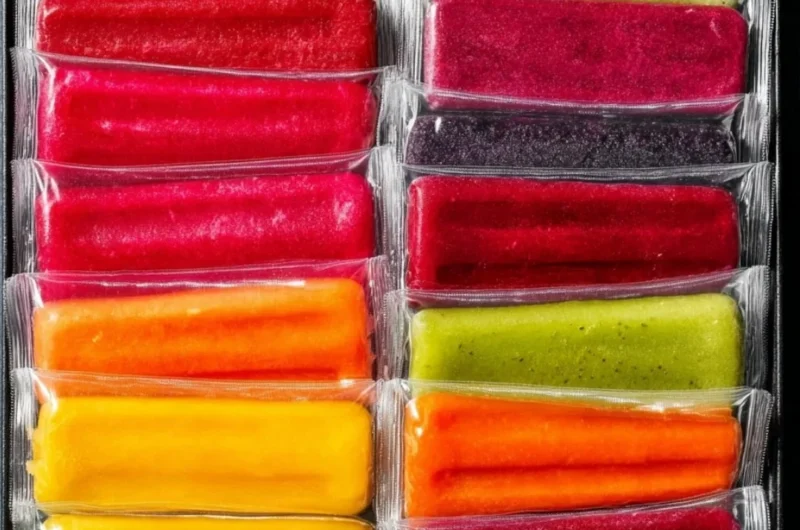
Healthy Homemade Freezer Pops
When the sun starts to beam down and the air gets that perfect summer warmth, there’s nothing quite as refreshing as a homemade freezer pop. The first time I made these delightful treats, it was a lazy afternoon, the kind where the clock seems to melt away. Inspired by memories of childhood summers, where grocery store pops were a guilty pleasure, I decided to craft a healthier version that my family would adore. These healthy homemade freezer pops are creamy, vibrant, and bursting with natural flavors, making them the perfect cooling treat. This is one you’ll definitely want to pin for later!
Why You’ll Love This Recipe
- Quick and easy to make, perfect for a last-minute treat
- No-bake and kid-friendly, ensuring everyone gets involved
- Endless flavor possibilities to match your taste buds
- Packed with wholesome ingredients, giving you peace of mind
- Great for meal prep; stock your freezer for hot days
Ingredients You’ll Need for Healthy Homemade Freezer Pops
Gather These Simple Ingredients:
- 2 cups of fresh fruit (berries, mango, or watermelon work great)
- 1 cup of Greek yogurt (or dairy-free yogurt for a vegan option)
- 2 tablespoons of honey or maple syrup (adjust based on fruit sweetness)
- 1 tablespoon of lemon juice (zesty and bright!)
- Optional: ½ cup of coconut milk or almond milk for a creamier texture
How to Make Healthy Homemade Freezer Pops
Let’s Make It Together:
Blend the Fruit: In a blender, combine your chosen fruit, Greek yogurt, honey or maple syrup, and lemon juice. If you’re using coconut milk or almond milk, add that now for an extra creamy texture.
Taste and Adjust: Take a spoonful and taste your mixture. Depending on the sweetness of your fruit, you may want to add more honey or syrup!
Pour and Fill: Carefully pour the mixture into ice pop molds. Make sure to leave a little space at the top as the pops will expand when they freeze.
Insert Sticks: If your molds don’t come with sticks, gently insert wooden popsicle sticks into the center of each mold.
Freeze: Place the molds in the freezer for at least 4-6 hours, or until the pops are solid and ready to enjoy.
Enjoy: To release the pops, run warm water over the outside of the mold for a few seconds. Then, wiggle and pull gently to remove your creamy, vibrant freezer pop!
Fun Ways to Customize It
Delicious Variations to Try:
Berry Bliss: Blend strawberries, blueberries, and raspberries for a mixed berry explosion. The pops will be a stunning deep purple and packed with antioxidants!
Tropical Paradise: Combine pineapple, coconut milk, and a squeeze of lime for a zesty, tropical treat that feels like a mini-vacation.
Creamy Peanut Butter Banana: Mash ripe bananas and blend with Greek yogurt and a spoonful of creamy peanut butter for a rich and indulgent version.
Green Goddess: For a nutritious twist, blend spinach or kale with banana and a splash of orange juice. This vibrant green pop is refreshing and packed with vitamins!
Chef Emma’s Helpful Tips
Make Ahead: These freezer pops can be made a week in advance, making them an excellent option for summer parties or easy snacks.
Mold Matters: Silicone molds make it easier to remove the pops compared to traditional plastic ones. Plus, they come in fun shapes!
Layering Flavors: For a fun presentation, pour different flavors in layers. Just allow each layer to freeze for about an hour before adding the next.
Storage Suggestions: Once frozen, you can transfer the pops to a freezer-safe bag to save room in your freezer. They’ll keep for up to two months!
What’s Inside – Nutrition Breakdown
- Serving Size: 1 freezer pop
- Calories: 60
- Carbs: 14g
- Sugar: 9g
- Fat: 2g
- Protein: 2g
- Sodium: 20mg
Frequently Asked Questions
Can I make this ahead?
Absolutely! These freezer pops can be made in advance and stored in the freezer for up to two months!
Can I use different ingredients?
Definitely! Get creative with your favorite fruits and yogurts. Almost anything goes!
How do I store leftovers?
If there are any leftovers, pop them in a freezer-safe bag or container after they’re frozen for an easy grab-and-go snack.
How long does it last?
These delicious freezer pops will last about two months in the freezer, but they’re so good, they probably won’t last that long!
Final Thoughts
These healthy homemade freezer pops are not just a treat; they’re a wholesome way to savor the summer in each delightful bite. The memories they evoke and the smiles they bring to our family are truly what make this recipe special. So, don’t wait—save this Healthy Homemade Freezer Pops recipe to your summer treat board so it’s ready when you need a cozy, refreshing snack!

Healthy Homemade Freezer Pops
- Total Time: 240 minutes
- Yield: 6 servings 1x
- Diet: Vegetarian
Description
Creamy and vibrant homemade freezer pops made with fresh fruit and Greek yogurt, perfect for a refreshing summer treat.
Ingredients
- 2 cups of fresh fruit (berries, mango, or watermelon)
- 1 cup of Greek yogurt (or dairy-free yogurt for a vegan option)
- 2 tablespoons of honey or maple syrup
- 1 tablespoon of lemon juice
- ½ cup of coconut milk or almond milk (optional)
Instructions
- Blend the fruit: In a blender, combine your chosen fruit, Greek yogurt, honey or maple syrup, and lemon juice. If you’re using coconut milk or almond milk, add that now for an extra creamy texture.
- Taste and adjust: Take a spoonful and taste your mixture. Add more honey or syrup as needed depending on the sweetness of your fruit.
- Pour and fill: Carefully pour the mixture into ice pop molds, leaving space at the top for expansion as the pops freeze.
- Insert sticks: If your molds don’t come with sticks, gently insert wooden popsicle sticks into the center of each mold.
- Freeze: Place the molds in the freezer for at least 240-360 minutes, or until the pops are solid and ready to enjoy.
- Enjoy: To release the pops, run warm water over the outside of the mold for a few seconds, then wiggle and pull gently to remove your freezer pops.
Notes
These pops can be made a week in advance and stored in a freezer-safe bag for two months. Silicone molds make removal easier compared to traditional plastic ones.
- Prep Time: 15 minutes
- Cook Time: 0 minutes
- Category: Dessert
- Method: Freezing
- Cuisine: American
Nutrition
- Serving Size: 1 pop
- Calories: 60
- Sugar: 9g
- Sodium: 20mg
- Fat: 2g
- Saturated Fat: 1g
- Unsaturated Fat: 1g
- Trans Fat: 0g
- Carbohydrates: 14g
- Fiber: 1g
- Protein: 2g
- Cholesterol: 5mg